
Satisfy your craving for a tasty and easy meal with this delicious Ground Beef Nachos recipe. Perfect for a quick weeknight dinner or game day snack! Crunchy tortilla chips piled high with taco seasoned ground beef, black beans, corn, creamy Queso cheese, and all the toppings you desire!
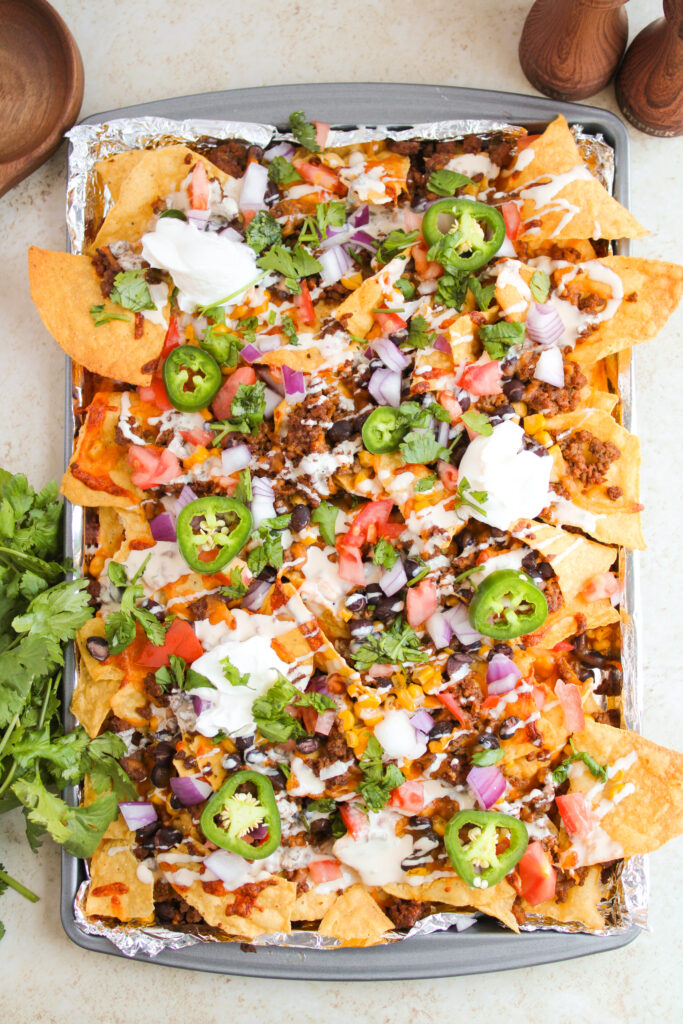
These Sheet Pan Beef Nachos are a family favorite and are fully customizable! Using simple store-bought ingredients and a few pantry staples, you can make the easiest, most delicious loaded nachos and serve as an appetizer or full meal! We love enjoying these during busy weeknights, on lazy weekends, or when hosting people over to watch a sporting event (check out my BEST Super Bowl Appetizers Recipe Round-Up too). We serve with a side of my Tableside Guacamole and Mexican Street Corn Dip and we all load our plates up!
Ingredients Needed
Below is a brief overview of each ingredient needed as well as a few substitution options. To see printable recipe card with exact amounts and directions, scroll to the bottom of this post or click the “jump to recipe” button at the top.
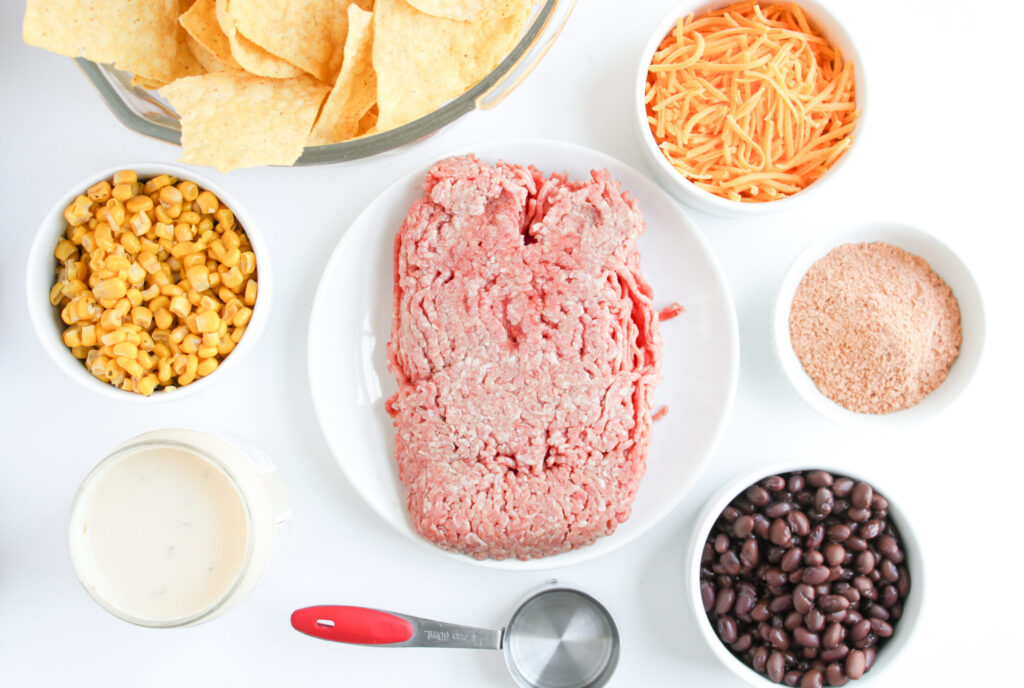
- Beef– You’ll use one pound ground beef. I like to use 80/20 ground beef, however, any lean count works. You can also use ground chicken or ground turkey.
- Water– you’ll use this when you add in the taco seasoning. It helps the seasoning to fully coat the meat.
- Corn– I use canned and drain. You can also use frozen corn, just make sure you cook it first.
- Black Beans– canned beans that have been drained and rinsed. I use low sodium to control salt in this recipe. Pinto beans are a great option too.
- Taco Seasoning– feel free to use one packet of store-bought taco seasoning, however, I LOVE making homemade taco seasoning because you can control all the added ingredients and really enhance the flavor.
- Queso– I love using Queso Blanco as it is flavorful and creamy. Most of the time, you’ll find recipes using only shredded Cheddar cheese. Although that is a great option too, adding the queso really brings these nachos to the next level. We love using my leftover homemade white queso and even Velveeta when short on time.
- Cheddar Cheese– freshly shredded is best as compared to the pre-shredded bags as they have an additive that coats the cheese to prevent clumping and it doesn’t melt as easily. Feel free to use Pepper Jack or Monterey Jack.
- Chips– my family loves using corn chips, however, classic nachos call for tortilla chips (Tostitos). Opt for the thick, crispy ones that will do a great job holding all the toppings as compared to thin, flimsy chips.
- Toppings– see options below.
Making Fully Loaded Nachos
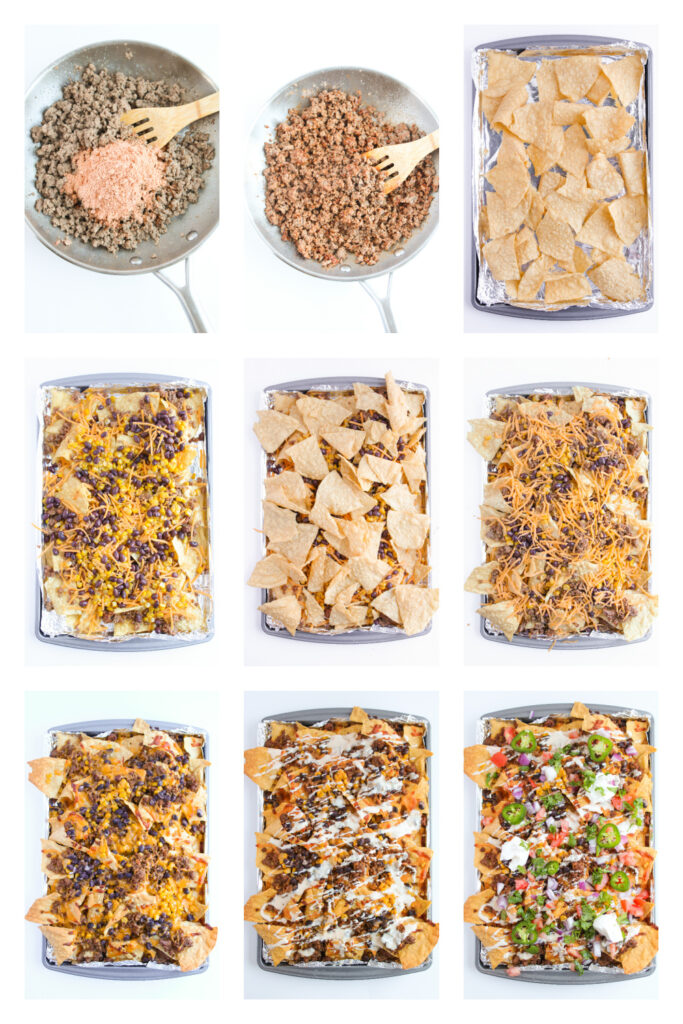
- Make the ground beef mixture. Cook the ground beef in a skillet over medium-high heat until no longer pink. Drain fat and add in the water and taco seasoning mix. Stir.
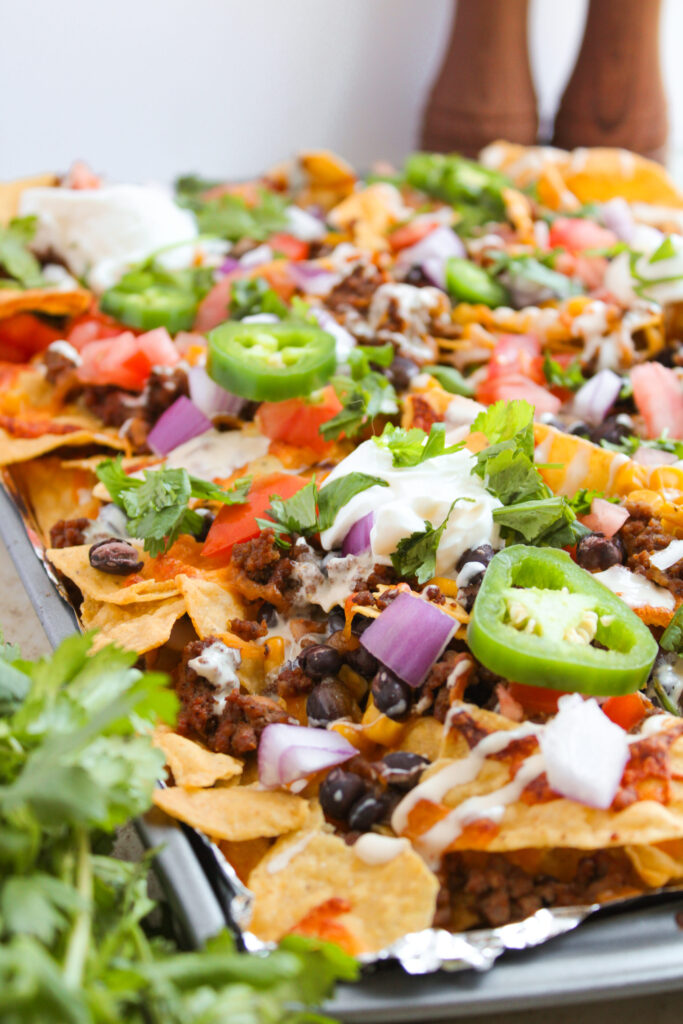
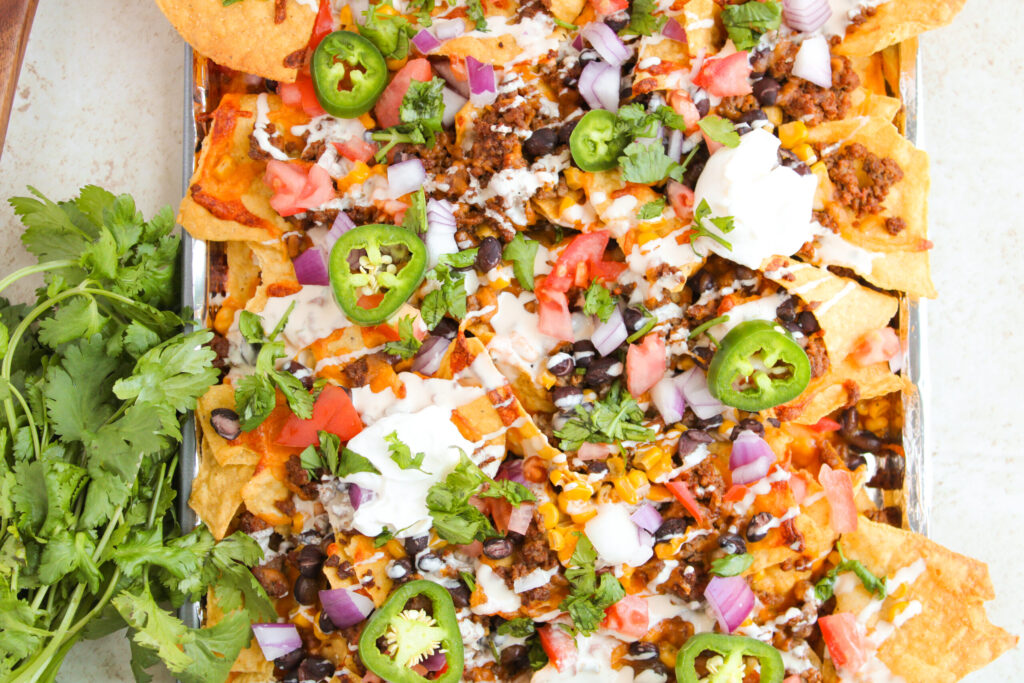
- Layer the toppings. Spread half the chips onto a lined baking sheet. Top with half of the beef mixture, half the beans, half the corn, and Cheddar cheese. Add second layer of chips and top with remaining beef, beans, corn, and shredded cheese.
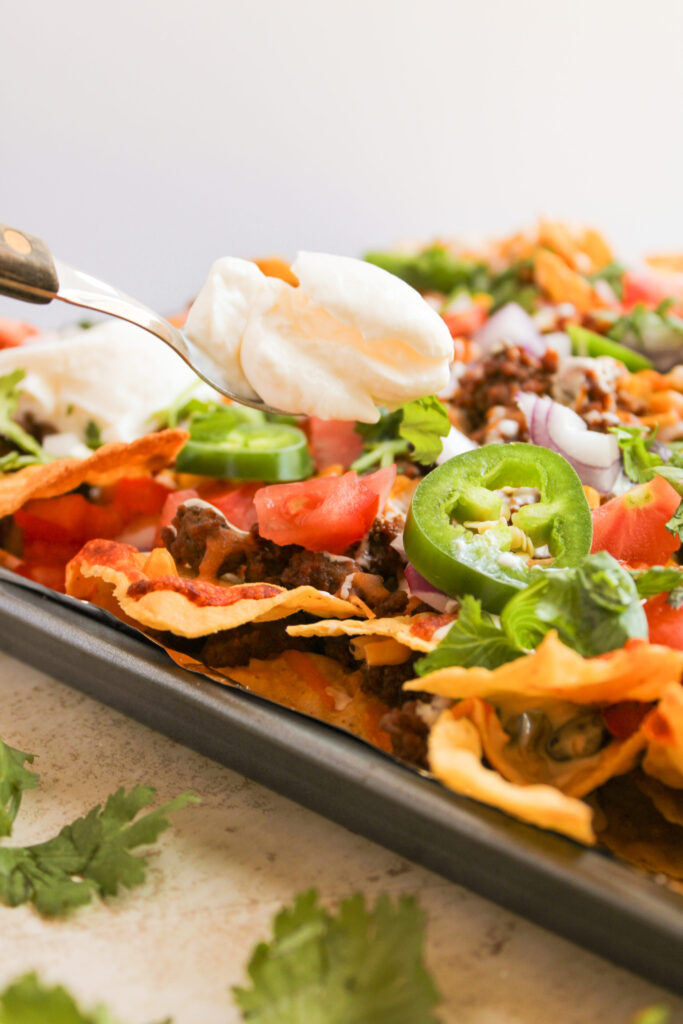
- Bake in oven. Allow to cook for about 6-8 minutes, or until chips are golden and cheese melts. Remove from oven and drizzle warm queso nacho cheese sauce on top.
- Add toppings and serve. Add all your desired toppings and dig in!
Toppings for Homemade Nachos
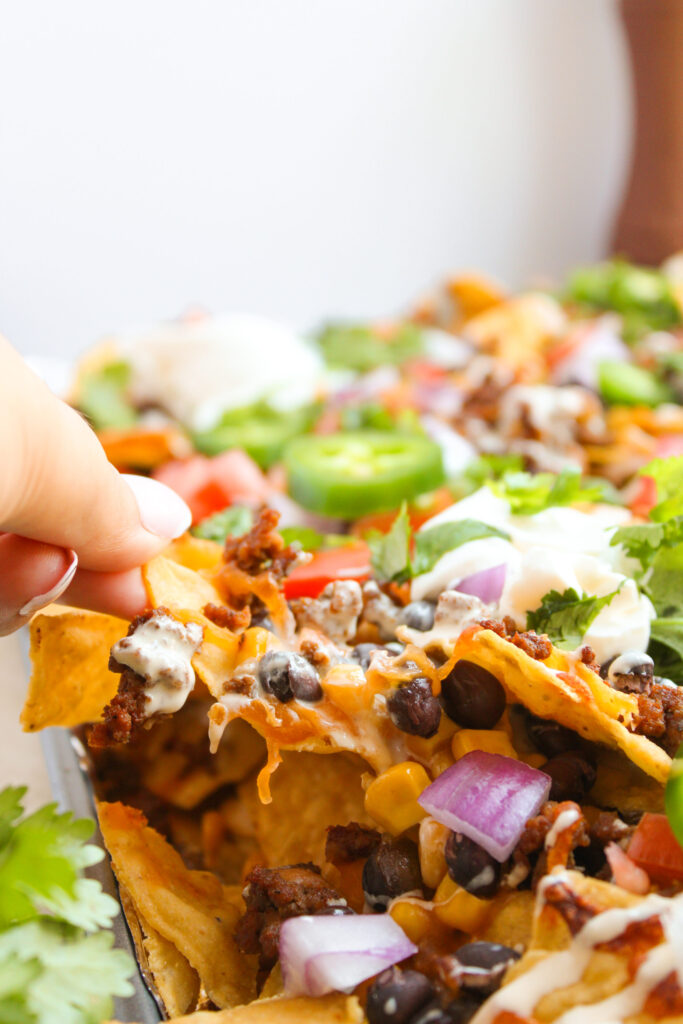
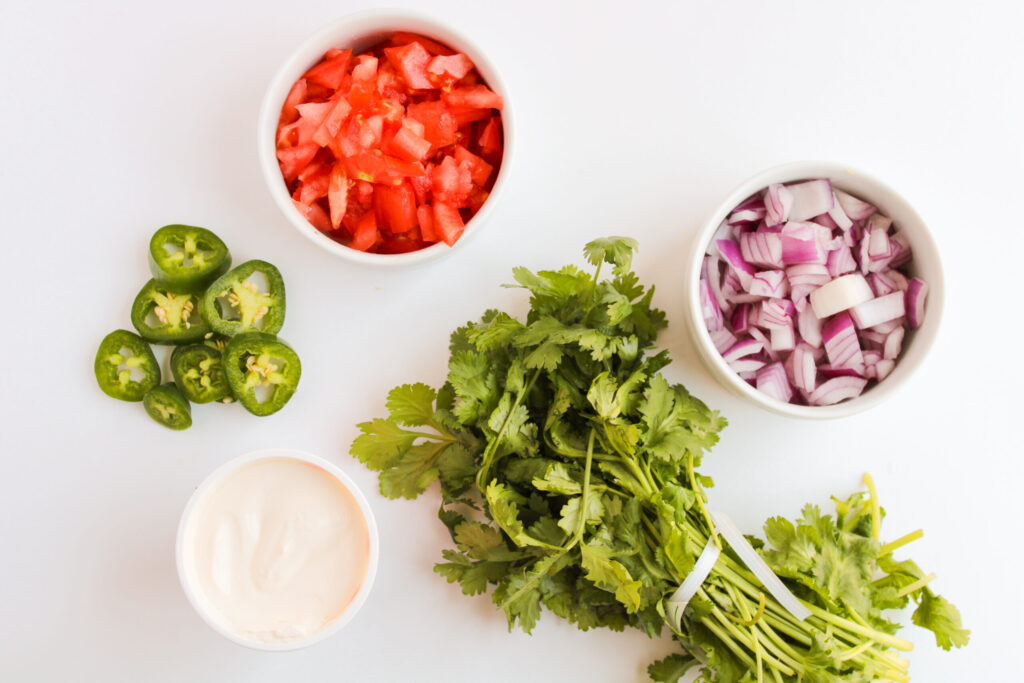
One of the best parts about loaded beef nachos is the toppings. So many great options to choose from and you can add as many as you want! Perfect for serving to large crowds and of course, picky eater approved since everyone can add what they desire. Some of our favorites to add on top include diced tomatoes, avocado, sliced black olives, chopped green onions, sour cream, salsa, Pico de Gallo, restaurant-style tableside guacamole, lime wedges, shredded lettuce, sliced radishes, fresh cilantro, and candied jalapenos!
Storage Tips
This nacho recipe is best served warm and fresh from the oven as it avoids the chips getting soggy. If you do have leftovers, allow to cool completely before placing in an airtight container to store in the fridge up to 2 days. To reheat, place the nachos on a baking sheet. Warm them in a 325°F oven just until heated through, about 5-10 minutes or use the air fryer. If you are wanting to freeze these, I don’t recommend freezing the chips and toppings. You can freeze the seasoned beef in a storage container up to 3 months. Thaw and use in this nachos with beef recipe.
What to serve with Loaded Beef Nachos
If you’re looking for sides that pair with this meat nachos recipe, here are some family favorites:
- Homemade Refried Beans
- Restaurant-Style Mexican Rice
- Mexican Street Corn Casserole
- Frozen Limeade Margaritas
- Layered Nacho Dip
- Mexican Charro Beans
- Mexican Street Corn Coleslaw
Frequently Asked Questions
How do I make this recipe gluten free?
Most corn chips are gluten free, but check the bag before using. Most cheeses are gluten free as well, so as long as you check ingredients, this recipe should be gluten-free. You can also make this vegetarian friendly by omitting the ground beef and using vegetables and beans as toppings.
What ingredients can I use to enhance the overall flavor?
You can add in a can of green chilies to the ground beef once cooked. You can also add in peppers, garlic powder, onions, and a splash of hot sauce for a bit of heat.
How much ground beef do I use to make ground beef nachos?
I use one pound when I am serving these to up to 8 people. If you are serving larger crowds, increase accordingly. You can also cut this recipe in half if serving smaller numbers.
Can I use any other chips besides tortilla chips?
Yes! Frito’s and Doritos are great options that add tons of flavor. My son loves Nacho Cheese Doritos as the base for his nachos.
More Tex Mex Recipes to try
Sheet Pan Quesadillas– these easy sheet pan quesadillas are made with taco seasoned ground beef, black beans, green chilies, and cheese for a delicious and satisfying meal. Ready in only 40 minutes, these are perfect for a busy weeknight dinner!
Cheesy Nacho Bake– the ultimate mac and cheese for Mexican food lovers. Loaded with taco seasoned ground beef, cheese, crushed tortilla chips, salsa, and pasta shells!
California Taco– packed with fresh ingredients and bursting with flavor, this recipe is sure to become a family favorite. Try it out tonight!
Taco Cornbread Casserole– made using taco seasoned ground beef, chili beans, and cheese, all under a layer of Jiffy cornbread! Perfect for busy weeknight dinners, this simple casserole is comfort food at its finest! Add your favorite toppings and dinner is served!
Frito Taco Bake– a quick and easy meal that is packed with flavor! Taco seasoned ground beef combined with a cheesy sauce and Frito’s; this walking taco casserole is comfort food at its finest.
Southwestern Chicken Quesadillas– easy to make and fully customizable, these quesadillas are perfect any time of day!
Want to save this recipe?
Enter your email & I’ll send it to your inbox. Plus, get great new recipes from me every week!

Easy Ground Beef Nachos Recipes
Ingredients
- 1 lb ground beef
- ¼ cup water
- 15 oz corn drained if canned, cooked if frozen
- 15 oz black beans drained and rinsed
- 1 oz taco seasoning
- ½ cup Queso store bought or homemade
- 2 cups Cheddar cheese shredded
- 12 oz corn chips
- Toppings of choice (jalapeno, sour cream, red onion, cilantro, tomato, etc.)
Instructions
- Heat a large skillet over medium-high heat. Add the ground beef and break it apart. Cook until browned, about 6 to 8 minutes. Drain the excess fat, then mix in the taco seasoning and ¼ cup water. Set aside.
- Preheat the oven to 400°F. Line a 9×13" or larger baking sheet with aluminum foil.
- Spread half of the chips onto the baking sheet in an even layer. Top with half of the ground beef, half of the corn, half of the black beans, and one cup of cheddar cheese.
- Add a second layer of the remaining chips. Top with the remaining beef, corn, black beans, and cheddar cheese.
- Bake in the oven for 6 to 8 minutes, or until the chips are golden and everything is heated through. Make sure to check on them to ensure they do not burn.
- Heat the queso blanco according to the directions on the jar. Remove from the oven and immediately drizzle the warmed queso over the nachos.
- Top with your favorite toppings and enjoy!


Catalina says
I made these for movie night and they were a hit. So cheesy and loaded with flavor!
Kristin says
Love that idea! The perfect dish for a good movie! Glad you enjoyed!
Cara says
A favorite in our house! It’s a fun dinner to make and we never have to worry about leftovers, it disappears every time!
Kristin says
Oh yes! Plus, its a great way to use up any leftover toppings from previous meals! Glad you enjoyed!
Mimi says
Nachos is the name! The most amazing party dish if you ask me. Keep my friends happy – thanks!
Kristin says
Love hearing this! Glad you enjoyed! Definitely a favorite in my house when hosting!
Vidhya says
I love how incredible these nachos are. The flavor goes through the roof, and the yield is just how I like it.
Kristin says
So much flavor!! Glad you enjoyed!
Mahy says
I can never say NO to nachos like these! They are the best and make every party of mine!
Kristin says
Yay!! Love hearing this! Such a fun and yummy recipe!
Maria says
This is my new go-to for parties and Taco Tuesdays. I made them last night to go with our tacos. We BARELY had room for the tacos. LOL.
Kristin says
LOL! You know they are good when they take the place of tacos! Glad you enjoyed!!
Beth says
THIS is how you do nachos! I made these last night for our Taco Tuesday, and it was a full meal!
Kristin says
Yay!! Glad you all enjoyed!!