
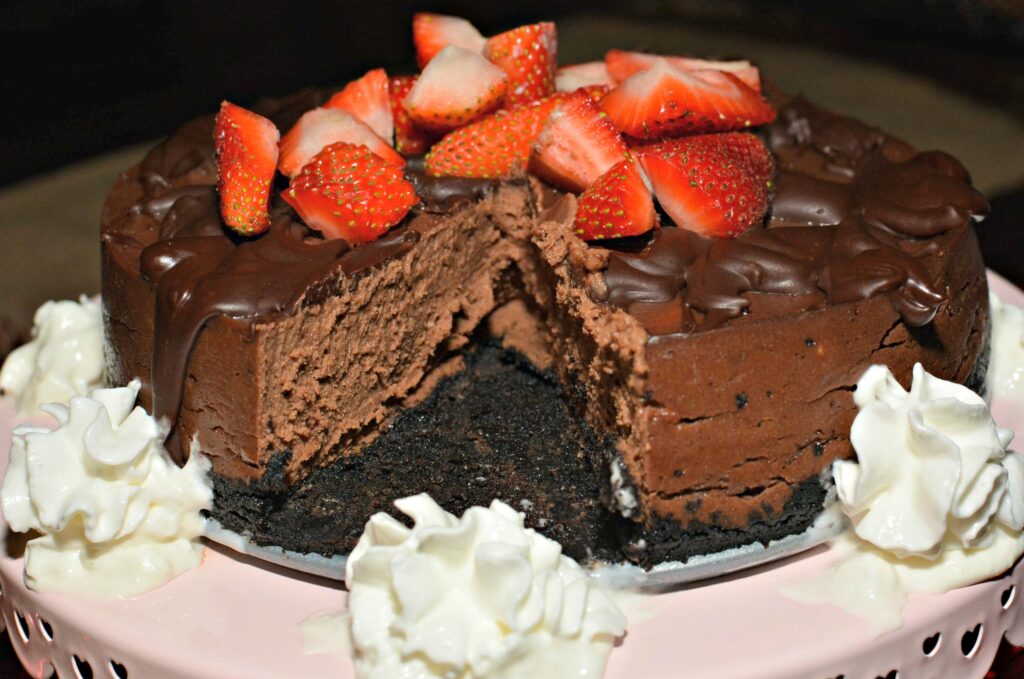
This Instant Pot Chocolate Cheesecake is every chocolate lovers dream come true! An Oreo crust and rich chocolate cheesecake filling combined into one Heavenly treat!

Have you tried making a cheesecake in your Instant Pot yet? If not, I highly recommend it! Not only is it the perfect size, but the flavor is incredible!
With Valentine’s Day coming up, I decided to make a chocolate cheesecake last week. I topped mine with some drizzled chocolate and chopped strawberries, but you can choose whichever toppings you prefer!
Since I have a 6-quart Instant Pot, I use a 7-inch springform pan and it fits perfectly! If you have a bigger/smaller Instant Pot, you may need to adjust accordingly!

I made this while my hubby was at work and kids were at school, so they were quite surprised when I pulled this out for dessert. My oldest kiddo piled even more strawberries on top and dug in, while my daughter pushed all her strawberries to the side to enjoy the cake only, ha-ha!
Not only is this cheesecake rich and creamy, but it is the perfect texture! I swear the Instant Pot makes everything better! If I’m being honest, I may even say this cheesecake is comparable (or slightly better) than Cheesecake Factory! Don’t believe me? Try it for yourself and you’ll see!!

If you are staying in on Valentine’s Day, or looking for a fun sweet treat to serve, definitely give this a go! You won’t regret it and may even want to make this a regular staple to your dessert plan!
Enjoy this Instant Pot Chocolate Cheesecake and be sure to let me know what you think of it!
I’d love to see pictures of your creations too, so use the hashtag #thecookinchicks on Instagram so I can check it out!
Want to save this recipe?
Enter your email & I’ll send it to your inbox. Plus, get great new recipes from me every week!

Instant Pot Chocolate Cheesecake
Ingredients
CRUST
- 20 Oreos
- 3 tablespoon butter, melted
CHEESECAKE
- 16 oz cream cheese, softened
- ½ cup sugar
- 1 teaspoon vanilla extract
- 1 cup chocolate chips, semi sweet
- ½ cup heavy cream
- 1 tablespoon cocoa powder
- 2 eggs
TOPPINGS (optional)
- Chopped Strawberries
- Melted Chocolate
- Whipped Cream
- Caramel Sauce
Instructions
Prepare Pan
- Spray the bottom of your 7 inch Spring form pan and coat entire pan/walls.
Prepare the Instant Pot
- Pour 1 ½ cups water into the bottom of your inner pot.
- Place metal trivet (the one that came with your pot) into Inner pot.
Prepare an aluminum foil sling
- To prepare your sling, take a piece of aluminum foil and fold lengthwise 3 times as shown in picture.
Prepare the Oreo Crust
- Place the Oreos into a food processor and pulse until fine crumbs.
- Pour in the melted butter and pulse until combined. *You may need to scrape sides to fully incorporate butter/cookie crumbs
- Pour crumb mixture into prepared pan and use a fork to pack the crumbs into a crust.
- Place pan into freezer while you prepare the cheesecake filling.
Prepare the Chocolate Cheesecake Filling
- Rinse out the food processor from the cookie crumb mixture.
- Add the cream cheese, sugar, and vanilla. Pulse until smooth and creamy.
- In a microwave safe bowl, melt the chocolate chips and heavy cream.
- Pour creamy chocolate mixture into cream cheese mixture and pulse food processor to combine.
- Add in the cocoa powder and pulse to incorporate.
- Lastly, add the eggs. Pulse to combine, but be careful not to overmix. Only pulse until just combined.
- Remove the pan from the freezer and pour cheesecake filling evenly over the crust.
- Cover the pan with a paper towel, followed by a piece of tin foil on top of the paper towel, making sure to cinch the sides.
- Lay the sling you made earlier on the counter and place the pan evenly on the center of it.
- Carefully set the pan onto the metal trivet, with the sling under the pan. *fold the edges of the sling on top of the pan once set into Instant Pot
Cook the Cheesecake
- Place Instant Pot lid securely on and ensure valve at top is in sealing position.
- Cook on manual, high pressure, for 40 minutes, followed by a 20 minutes natural pressure release.
- Once done, release any additional pressure and remove lid.
- Use the sling to remove the pan carefully from your Instant Pot.
- Allow cake to rest for about 5 minutes before removing foil/paper towel from top.
- Once foil/paper towel have been removed, allow cake to cool for about an hour before placing in the refrigerator.
- Chill for a minimum of 4 hours before serving.
- Garnish with desired toppings and enjoy!
Nutrition


Leave a Reply